Cisco CLI for Switches
Accessing Privileged EXEC Mode
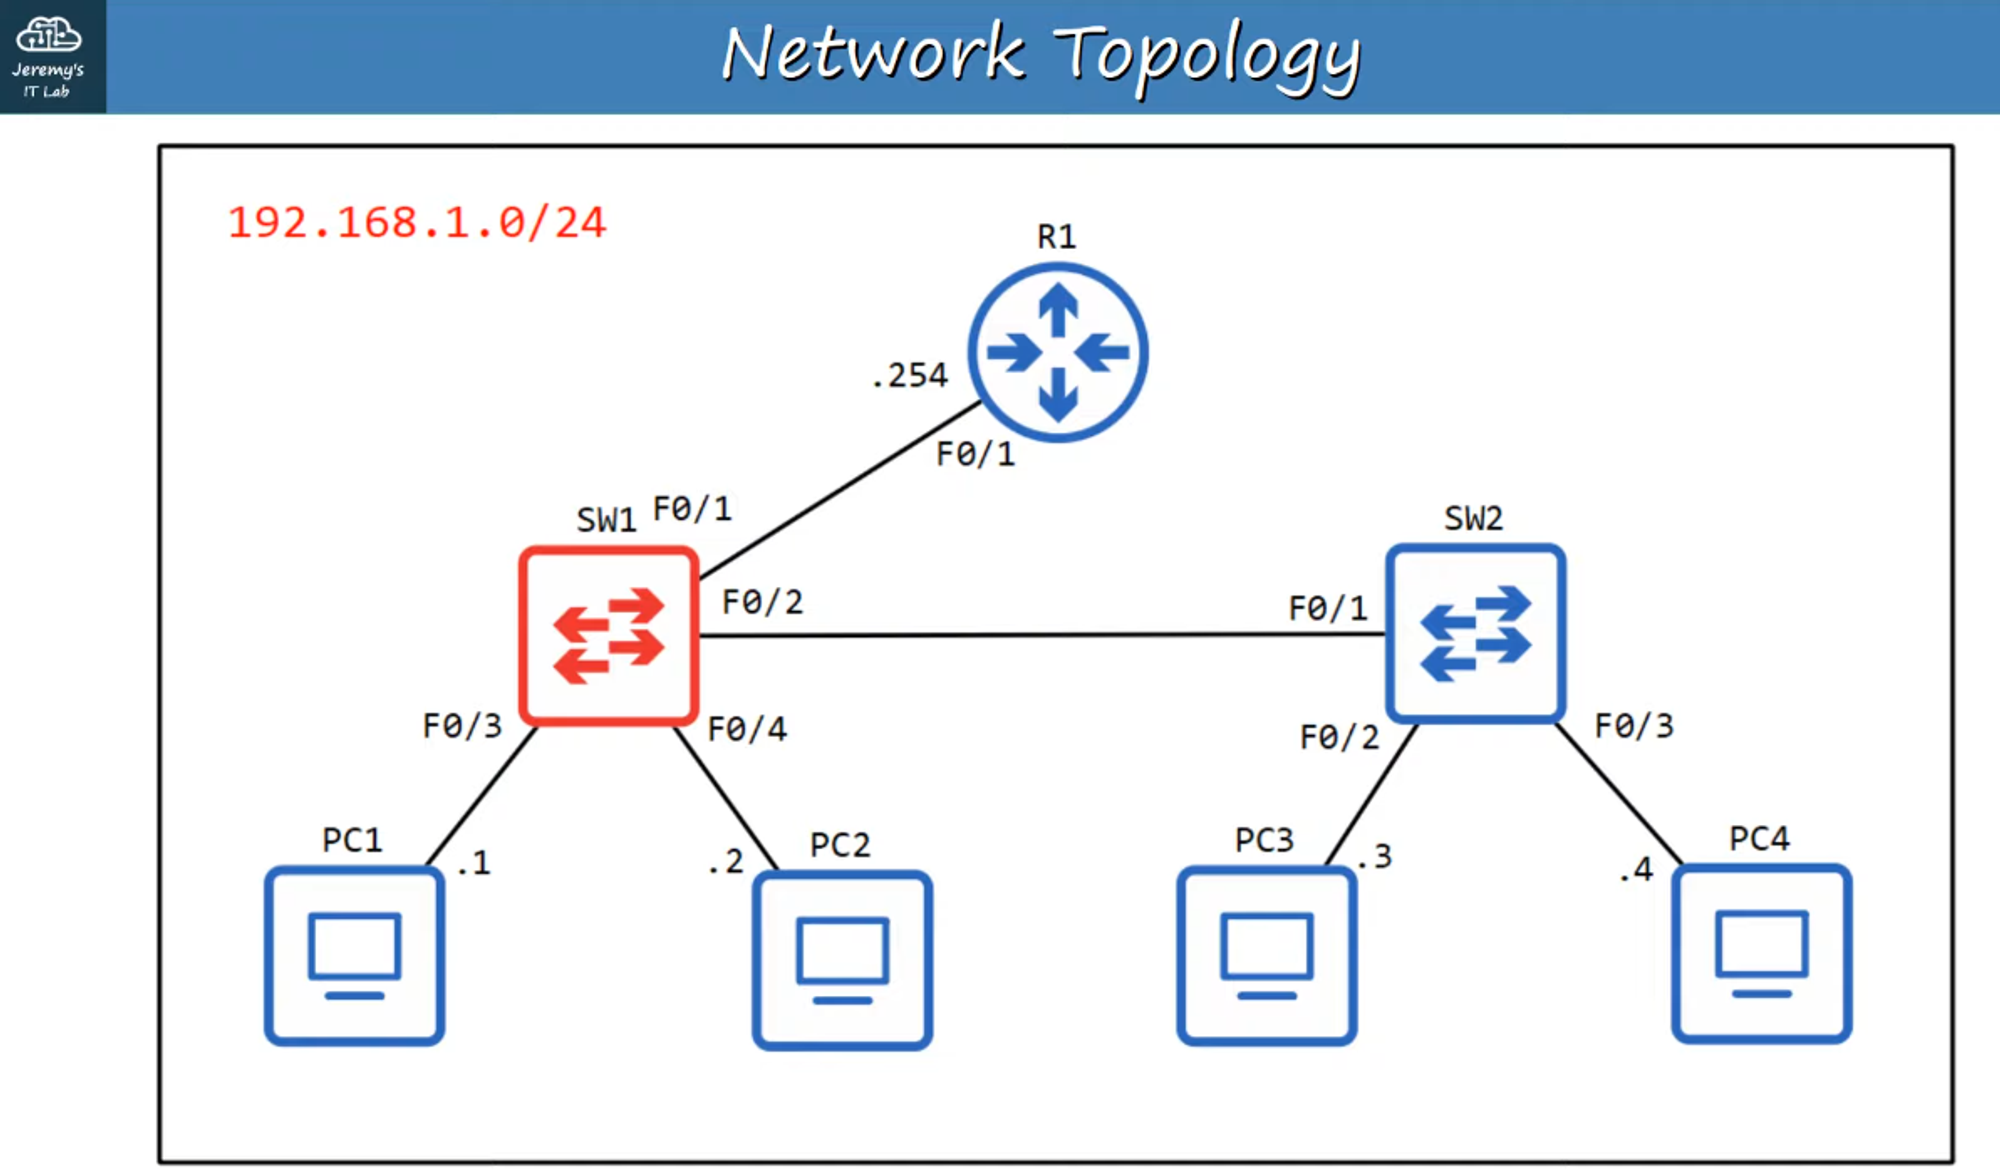
To start configuring or viewing details on a Cisco switch:
SW1> enableDisplaying Interface Information
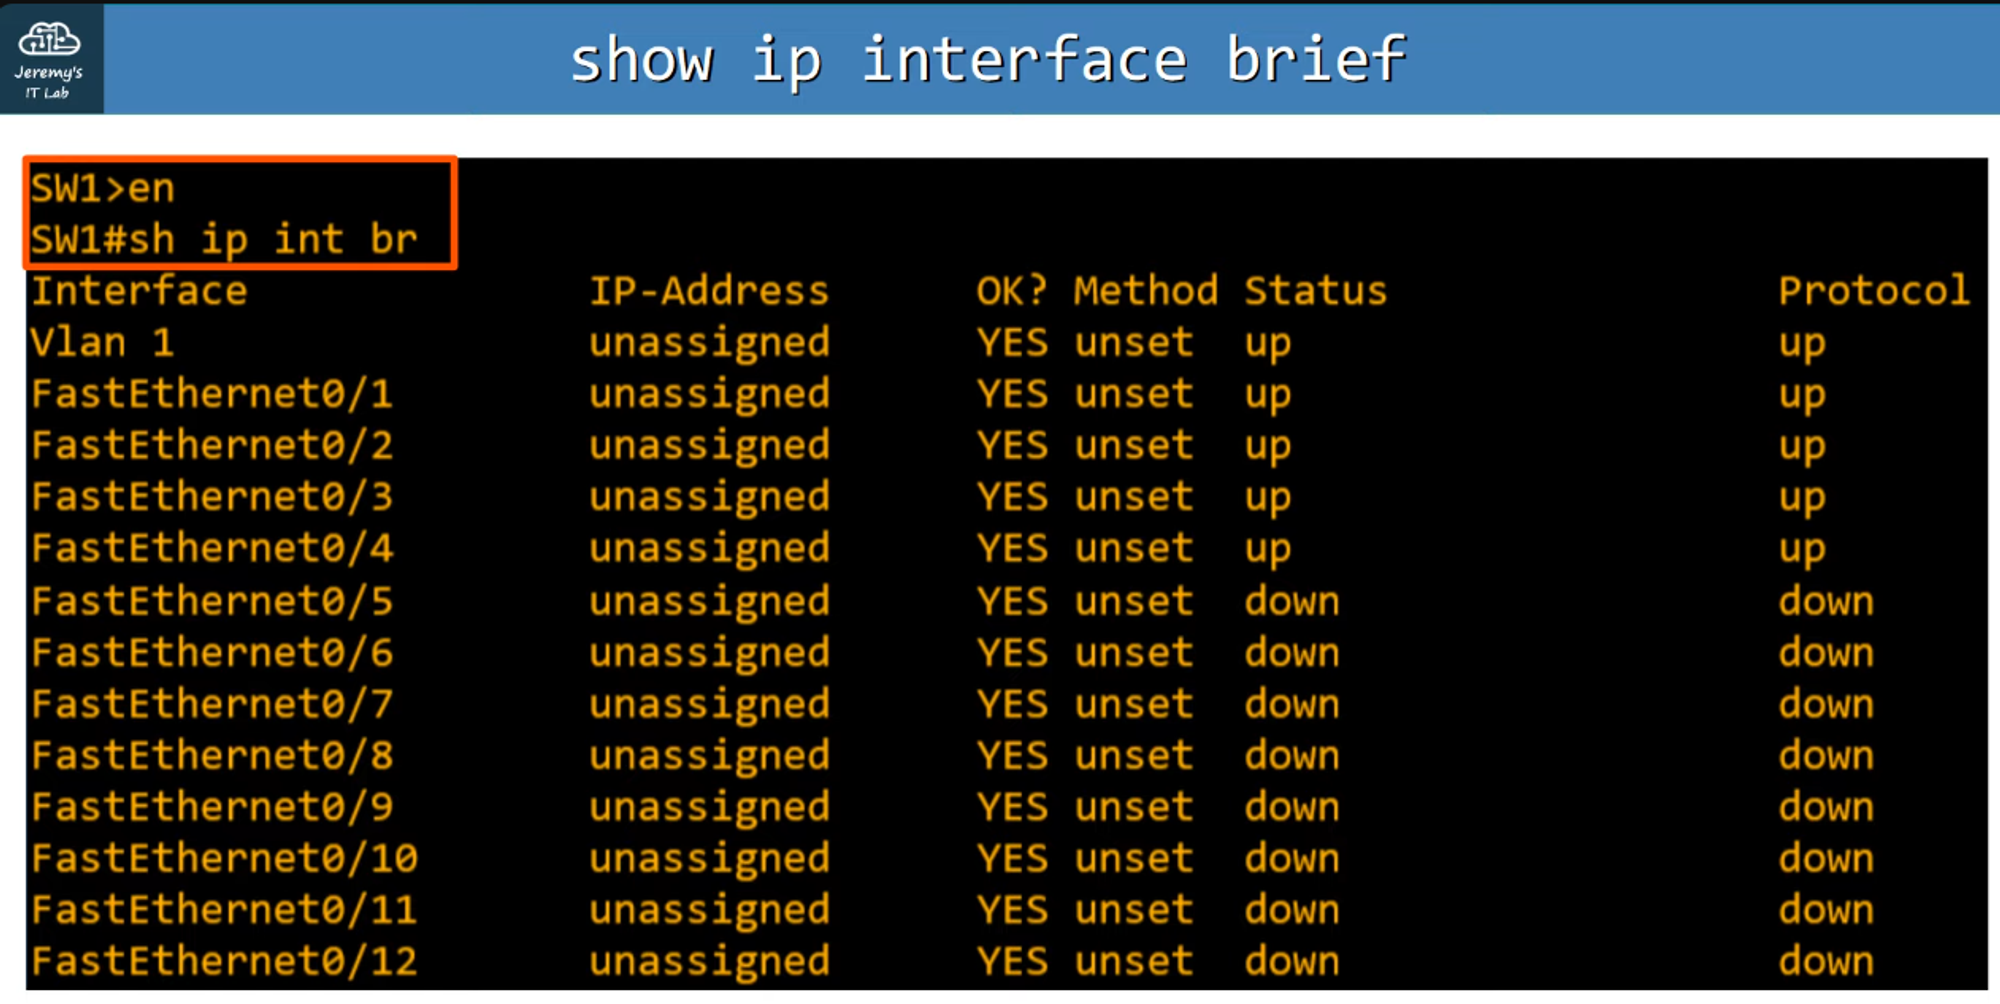
To view all interfaces on Switch 1:
SW1# show ip interface brief- Purpose: Displays all interfaces with key information similar to the command on Cisco routers.
- Columns:
- Interface: Lists all interfaces.
- IP-Address: Shows the assigned IP addresses.
- Method: Displays the IP address assignment method.
- Status (Layer 2): Indicates whether the interface is “up” or “down.”
- Protocol (Layer 1): Indicates the protocol status (also “up” or “down”).
Key Point: Unlike routers, switches do not default to ‘administratively down.’ Unconnected ports will show as “down/down,” indicating no physical connection.
Displaying Interface Status
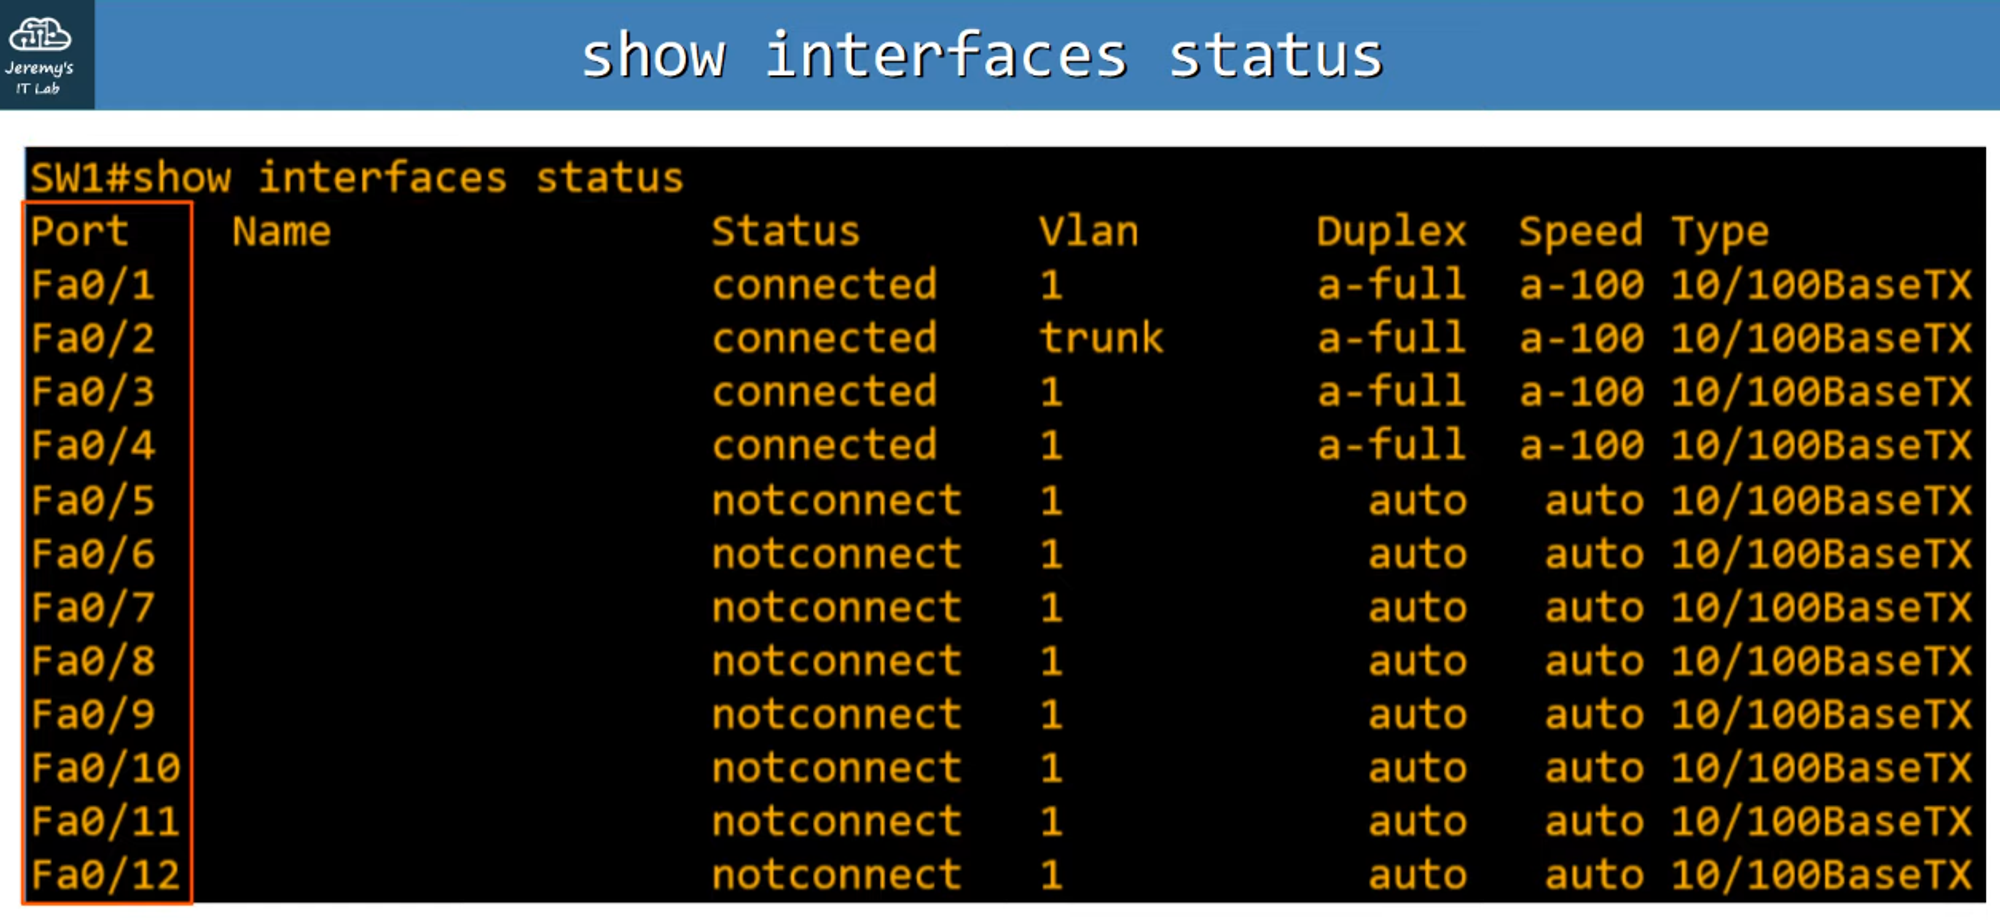
To view the status of all interfaces on SW1:
SW1# show interfaces status- Purpose: Lists various attributes of all interfaces on the switch.
- Columns:
- Ports: Lists all ports on the switch.
- Name: Displays the description of the interface (configurable by the user).
- Status: Shows the current connection status.
- Vlan: Indicates the VLAN associated with the interface (VLAN 1 is the default).
- Duplex: Shows if the connection is in half or full duplex mode.
- Speed: Displays the connection speed.
- Type: Describes the interface type and capabilities.
Interface Range Configuration
Deactivating Unused Interfaces
Unused interfaces can be a security risk, so it’s a good idea to deactivate them. You can apply changes to multiple interfaces at once.
-
Enter Global Configuration Mode:
SW1# config t -
Select a Range of Interfaces:
SW1(config)# interface range f0/5 - 12- Purpose: Selects interfaces FastEthernet 0/5 to FastEthernet 0/12.
-
Apply Configurations:
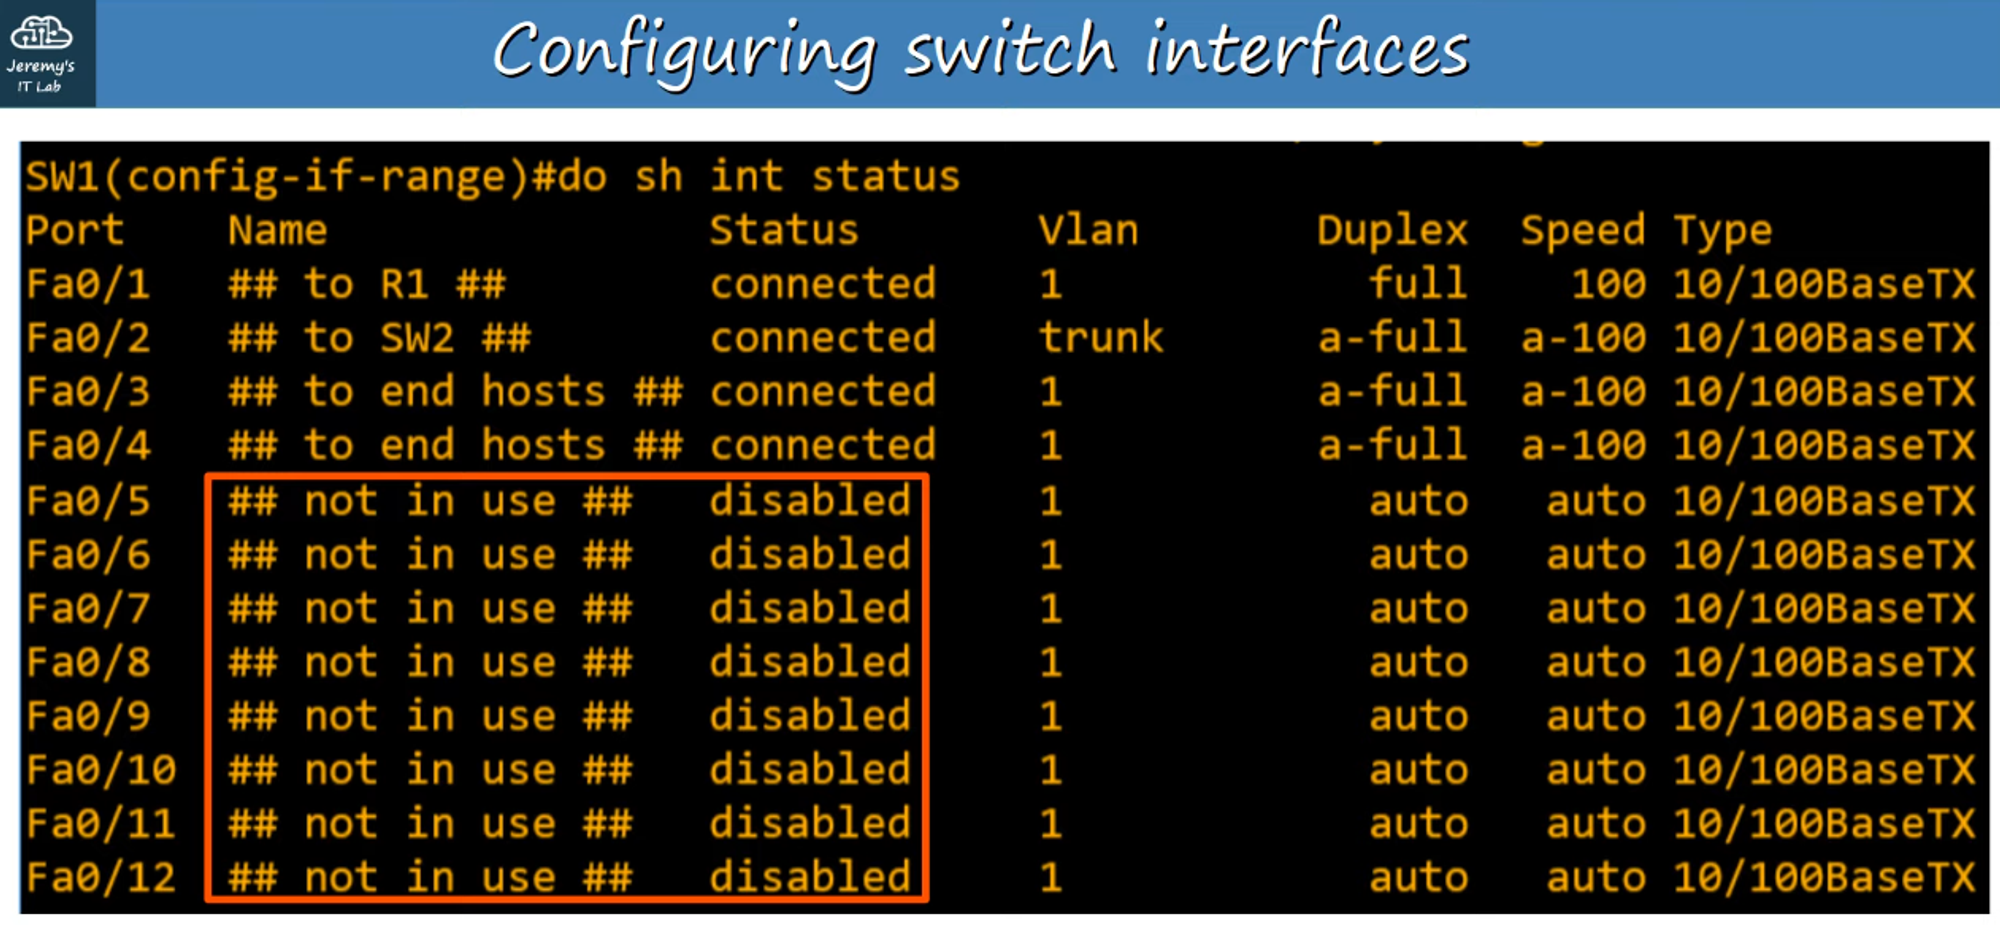
- Add a description:
SW1(config-if-range)# description ## not in use ## - Shut down the interfaces:
SW1(config-if-range)# shutdown
- Add a description:
-
Verification:
- Use
show interface statusin Privileged EXEC mode ordo show interface statusin Global Configuration mode to confirm the interfaces are administratively down.
- Use
Full Duplex vs. Half Duplex
Half Duplex
- Operation: Devices cannot send and receive data simultaneously. If receiving data, the device must wait before sending.
- Use Case: Historically used in LAN hubs, now rare.
- Issue: Causes collisions when multiple packets are received by the hub.
- Collision Domain: All devices connected to a hub are in the same collision domain.
Full Duplex
- Operation: Devices can send and receive data simultaneously, with no need to wait.
- Use Case: Supported by most modern switches, reducing or eliminating collisions.
Comparison:
- Hubs: Layer 1 devices; collisions are common and handled by CSMA/CD.
- Switches: Layer 2 devices; collisions rarely occur.
Speed and Duplex Autonegotiation
Autonegotiation
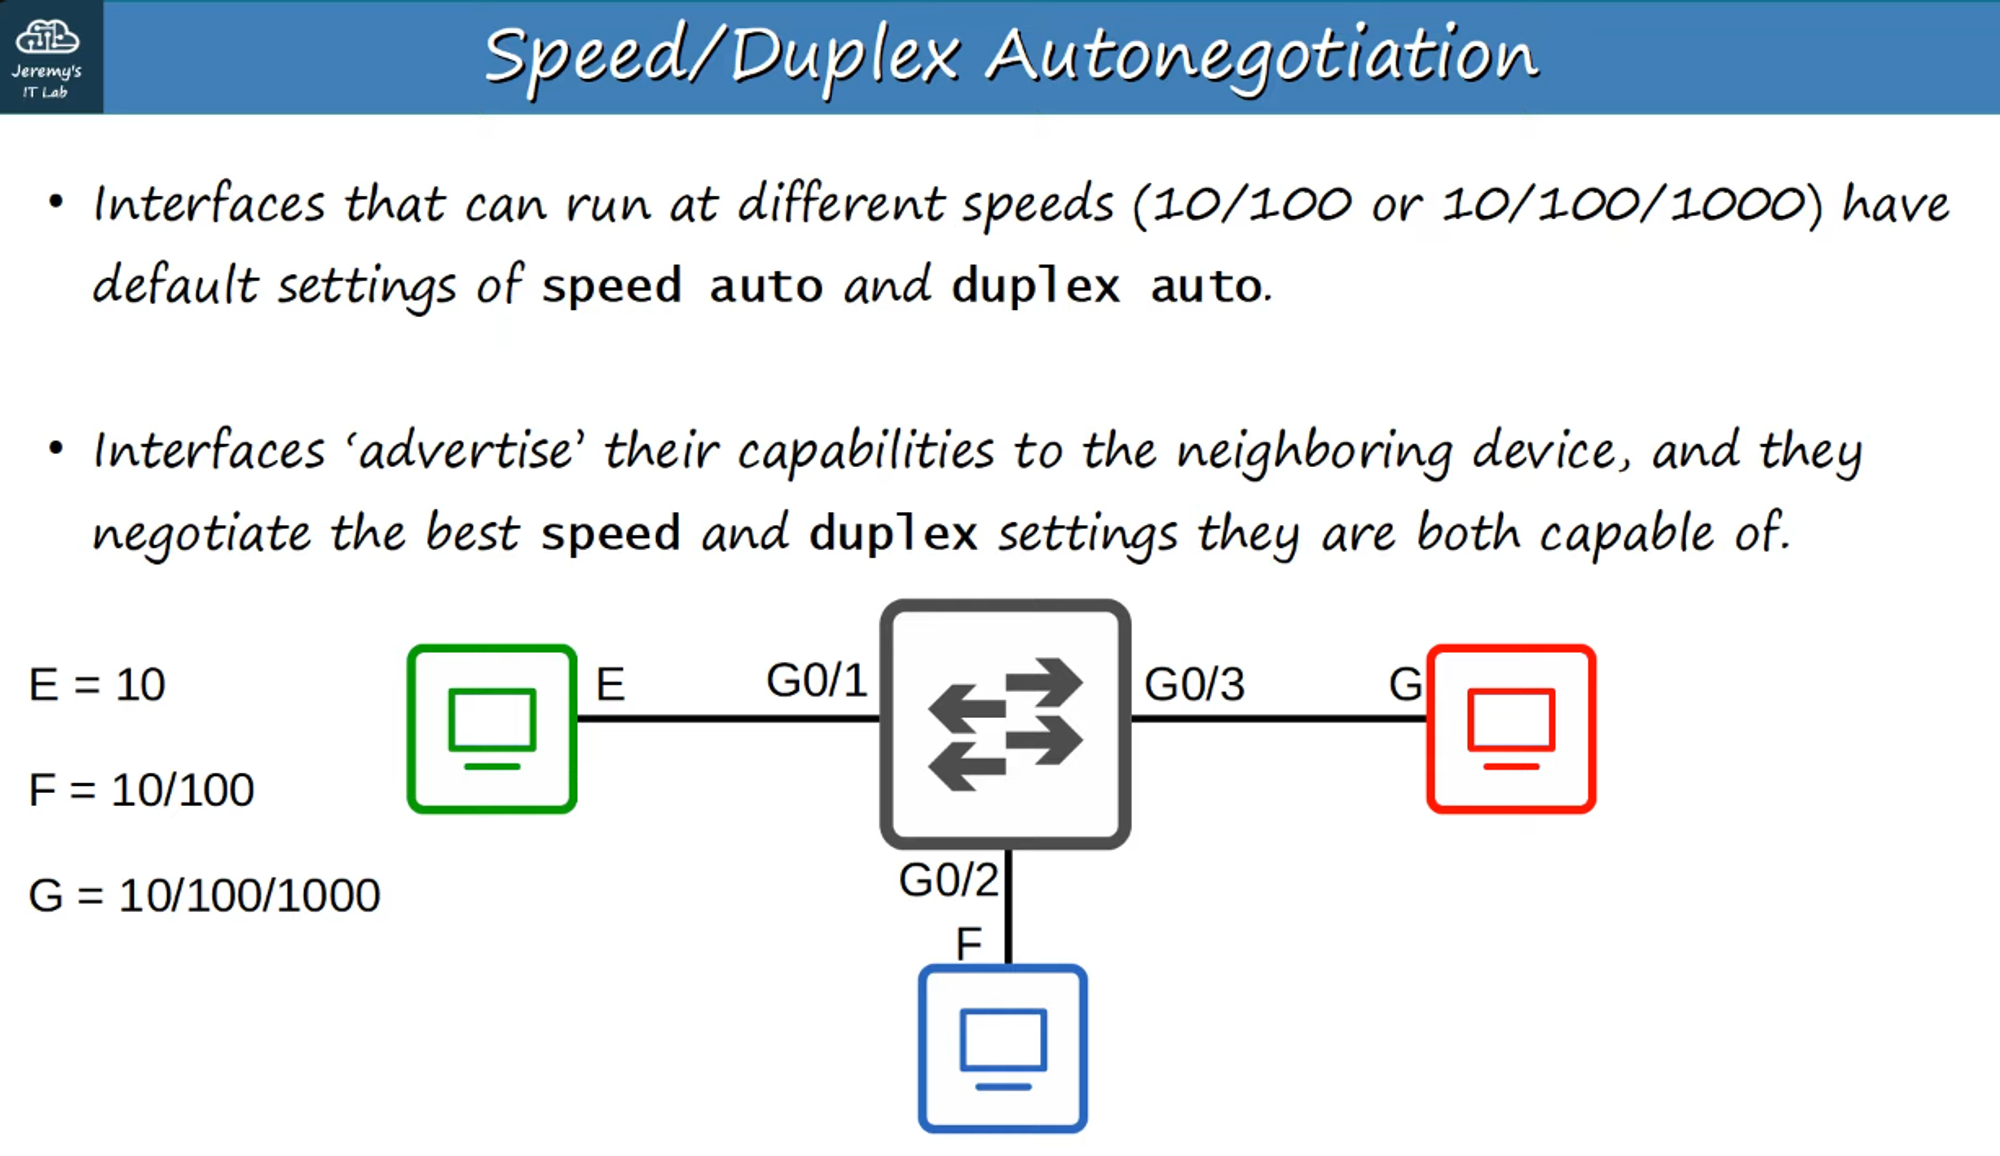
- Purpose: Interfaces that support multiple speeds (e.g., 10/100/1000 Mbps) default to autonegotiating both speed and duplex settings with connected devices.
- Process: Interfaces “advertise” their capabilities and negotiate the best possible speed and duplex mode.
If Autonegotiation is Disabled
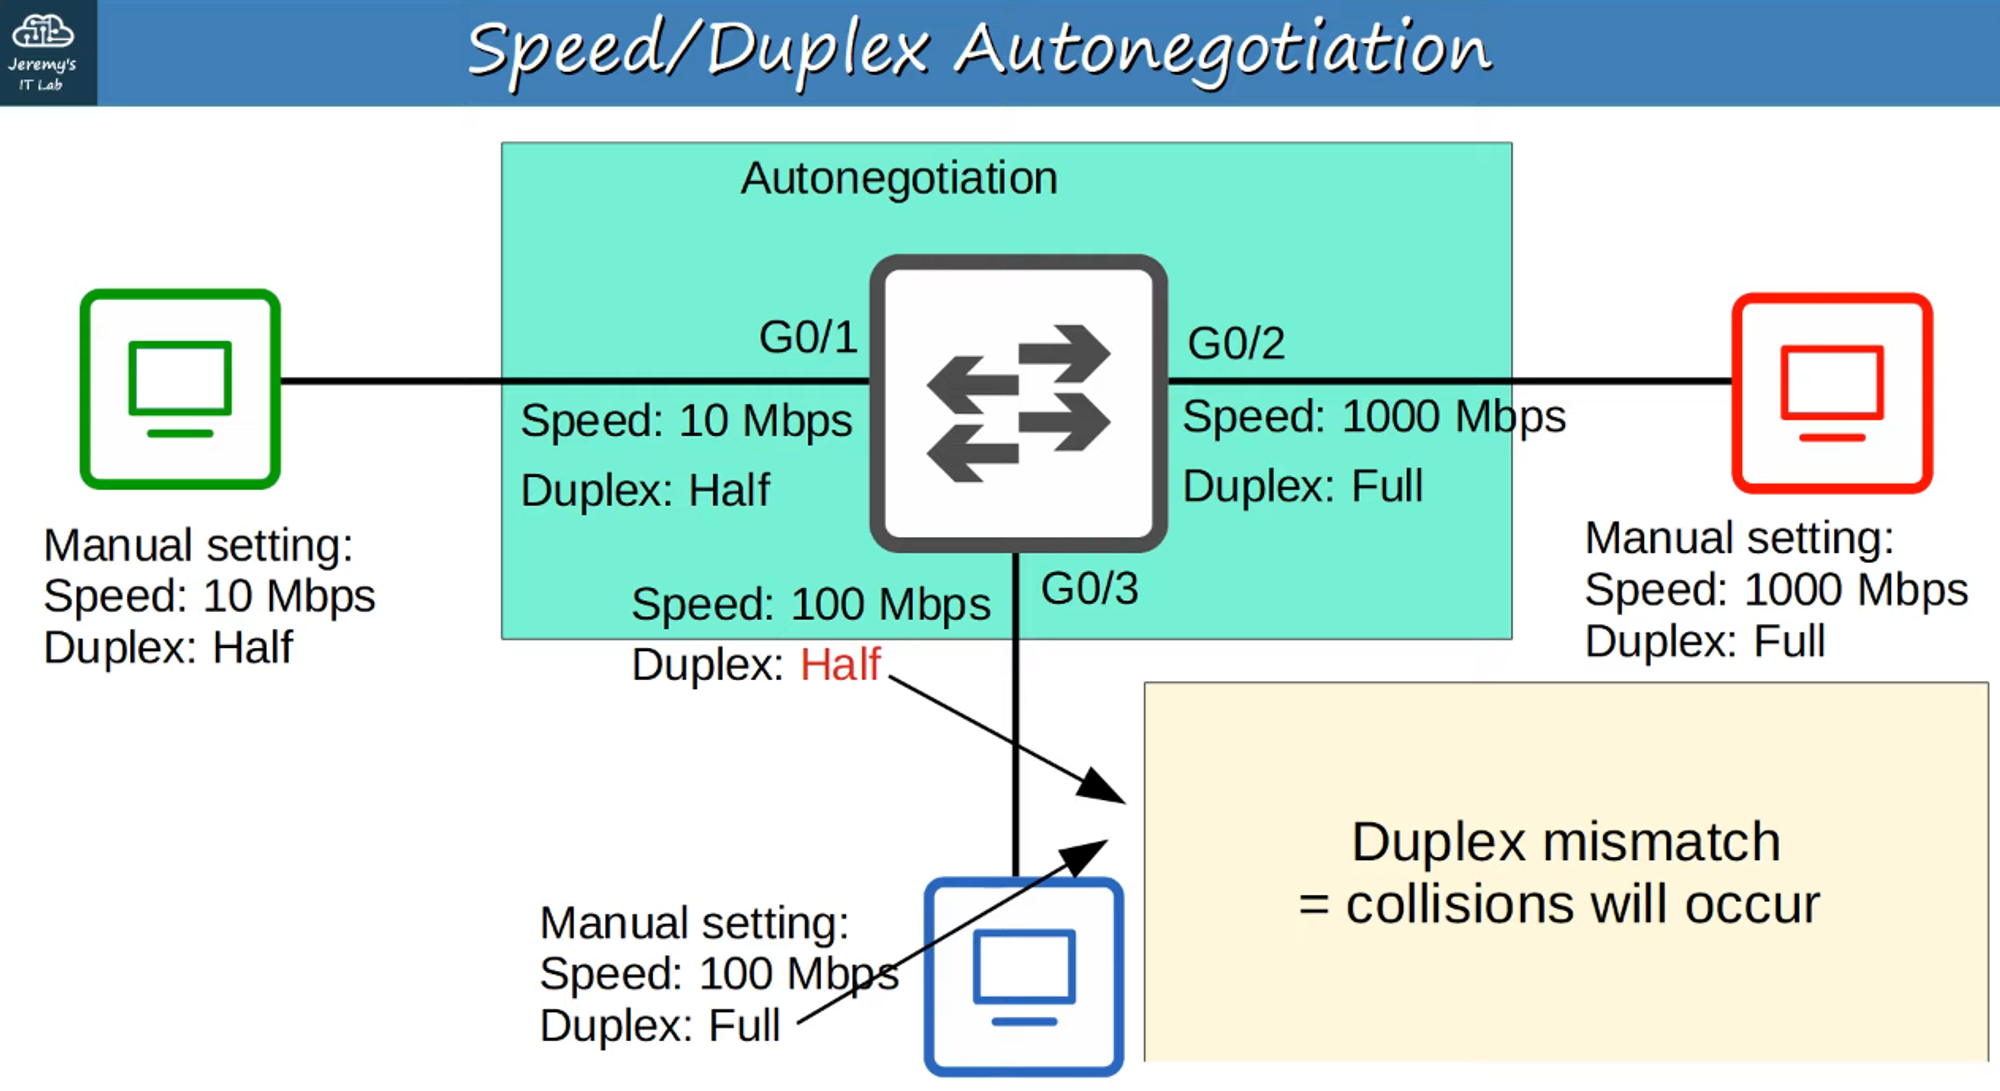
- Speed: The switch will attempt to match the speed of the connected device. If unsuccessful, it defaults to the slowest supported speed (e.g., 10 Mbps).
- Duplex: If the speed is 10 or 100 Mbps, the switch defaults to half duplex. If the speed is 1000 Mbps or higher, the switch uses full duplex.
Interface Counters and Errors
Monitoring Interface Errors
To monitor and troubleshoot interface errors:
SW1# show interfaces <interface name>Error Metrics:
- Packets Received / Total Bytes Received
- Runts: Frames smaller than the minimum size (64 bytes).
- Giants: Frames larger than the maximum size (1518 bytes).
- CRC Errors: Frames that failed the Cyclic Redundancy Check (CRC).
- Frame Errors: Frames with incorrect formatting due to errors.
- Input Errors: Total of various input errors, including runts, giants, and CRC errors.
- Output Errors: Frames the switch tried to send but failed due to errors.