OSPF Metric (Cost)
- Metric Name: In OSPF, the metric used to determine the best path is called Cost.
- Calculation: OSPF automatically calculates the cost based on the bandwidth (speed) of the interface. The formula is:
- Default Reference Bandwidth: 100 Mbps here some Example Calculations :
- Minimum Cost: If the calculated cost is less than 1, it is rounded up to 1.
- Fast Ethernet, Gigabit Ethernet, and Faster Links: Interfaces with 100 Mbps, 1 Gbps, 10 Gbps, etc., will all have the same cost of 1.
Changing the Reference Bandwidth
-
Command:
R1(config-router)# auto-cost reference-bandwidth <megabits-per-second>
✏️ The reference bandwidth is specified in megabits per second (default is 100 Mbps).
Example:
- Recommendation: Set the reference bandwidth higher than the fastest links in your network to accommodate future upgrades.
- Important: Changing the reference bandwidth should be done on all OSPF routers in the network.
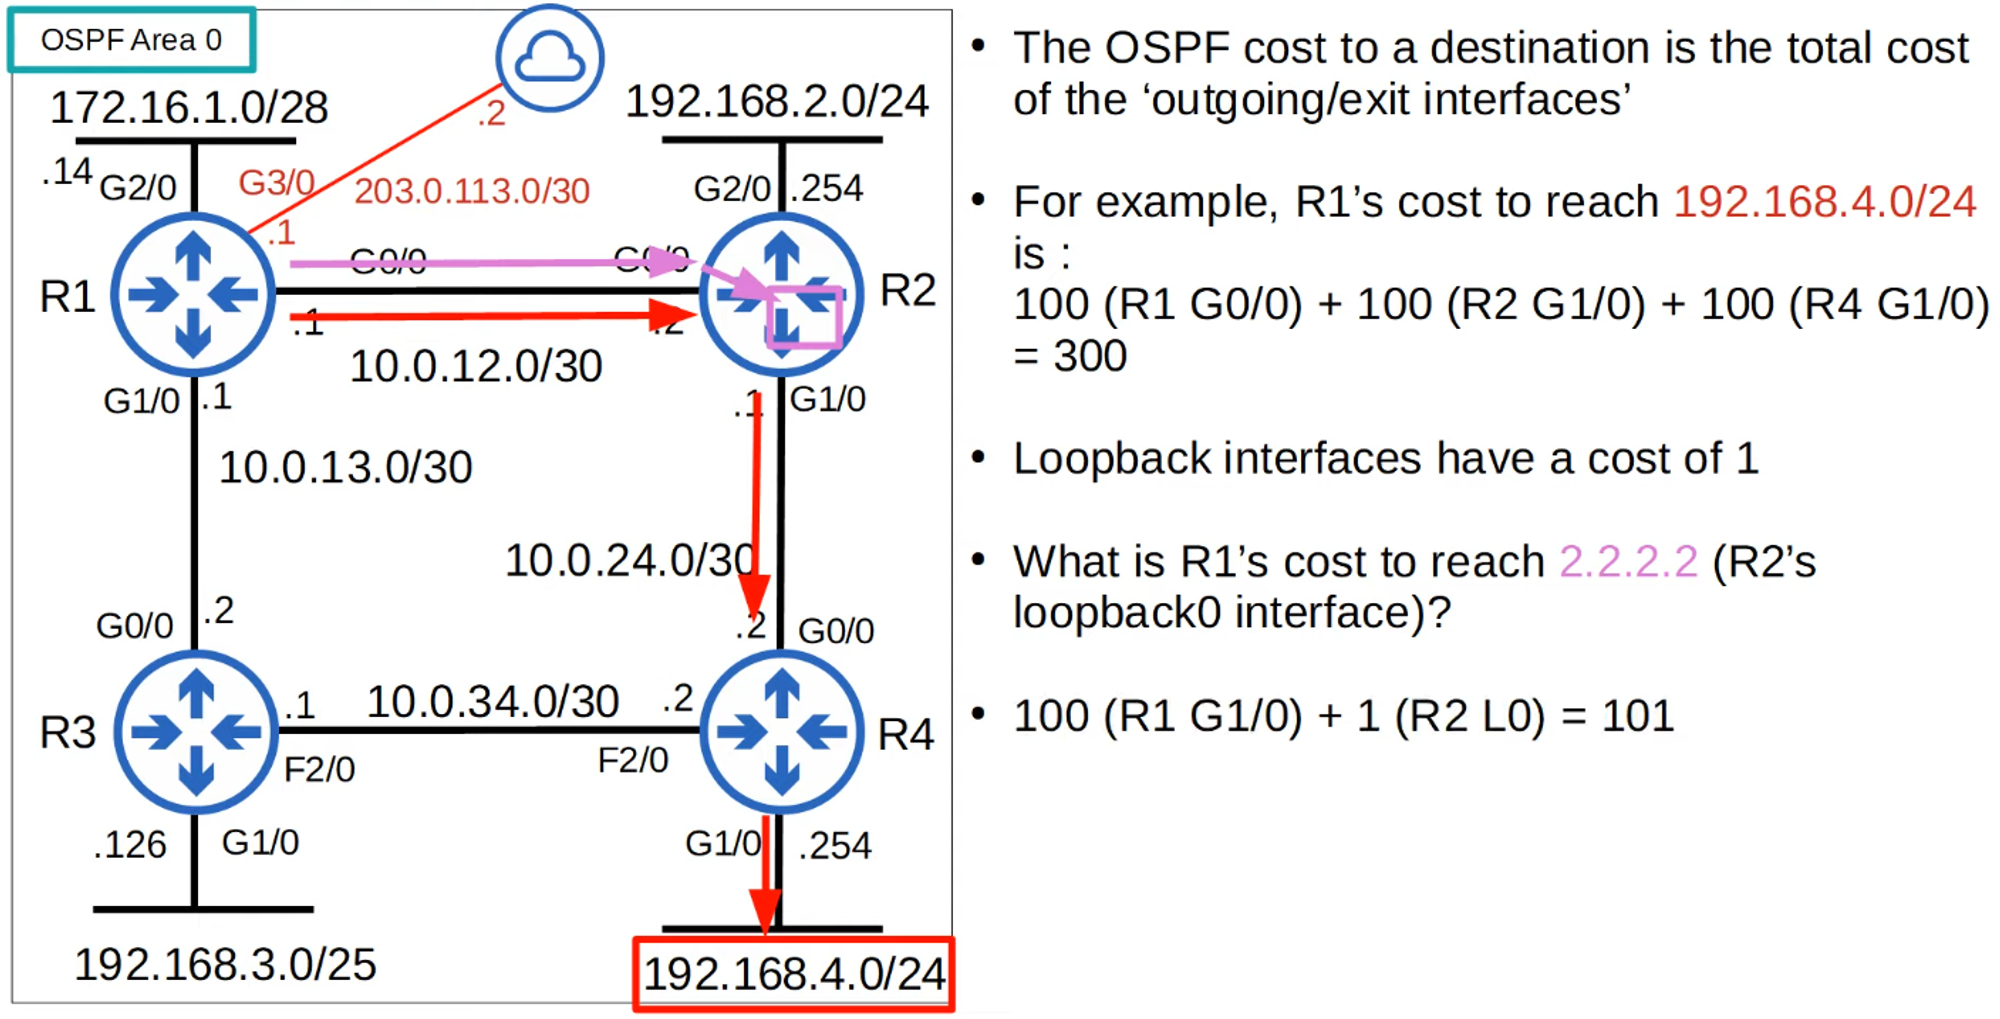
OSPF Cost to a Destination
- Total Cost: The OSPF cost to a destination is the sum of the costs of the outgoing (exit) interfaces.
- Loopback Interfaces: Default cost is 1.
Modifying OSPF Cost
-
Manual Cost Configuration:
R1(config-if)# ip ospf cost <cost> -
Precedence: Manually configured costs take precedence over automatically calculated costs.
-
Changing Interface Bandwidth:
- The OSPF cost can also be altered by changing the interface bandwidth using the
bandwidthcommand. - Formula:
- The OSPF cost can also be altered by changing the interface bandwidth using the
-
Note: Changing the bandwidth value does not actually change the physical speed of the interface; it only alters the OSPF cost calculation.
-
To change the actual operating speed of the interface, use the
speedcommand. -
Best Practice:
- It is recommended to adjust the reference bandwidth rather than the interface bandwidth.
- Then, use the
ip ospf costcommand for more precise cost adjustments.
Summary of OSPF Cost Modifications
-
Change the Reference Bandwidth:
R1(config-router)# auto-cost reference-bandwidth <megabits-per-second> -
Manual Configuration:
R1(config-router)# ip ospf cost <cost> -
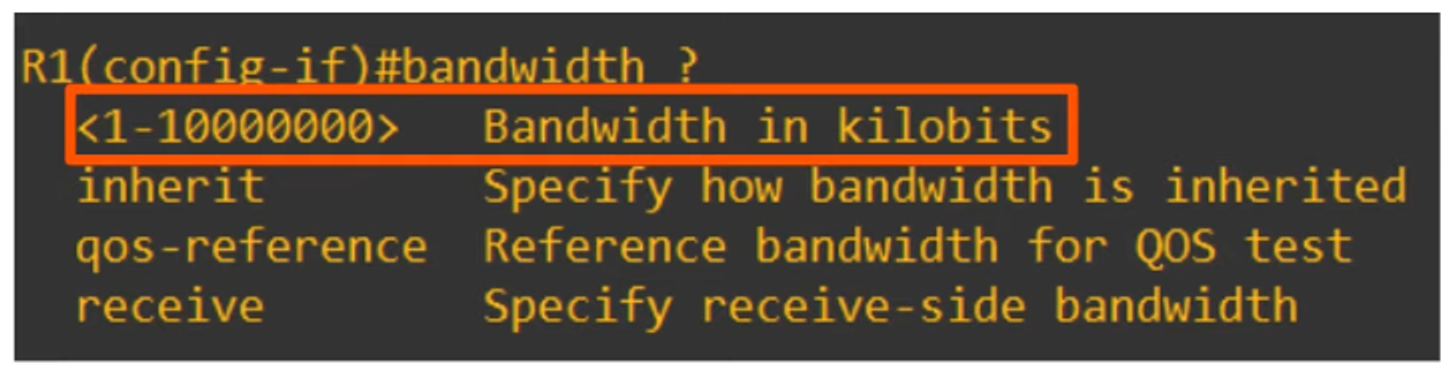
Change the Interface Bandwidth:
R1(config-if)# bandwidth <kilobits-per-second>

Becoming OSPF Neighbors
- Key Task: Ensuring routers successfully become OSPF neighbors is crucial for configuring and troubleshooting OSPF.
- Process:
- Once routers become neighbors, they automatically share network information and calculate routes.
Hello Messages
- Activation: When OSPF is activated on an interface, the router sends out Hello messages at regular intervals.
- Default Interval: 10 seconds on an Ethernet connection.
- Destination: Multicast to 224.0.0.5 (all OSPF routers).
- Protocol: OSPF messages are encapsulated in an IP header with a protocol value of 89.
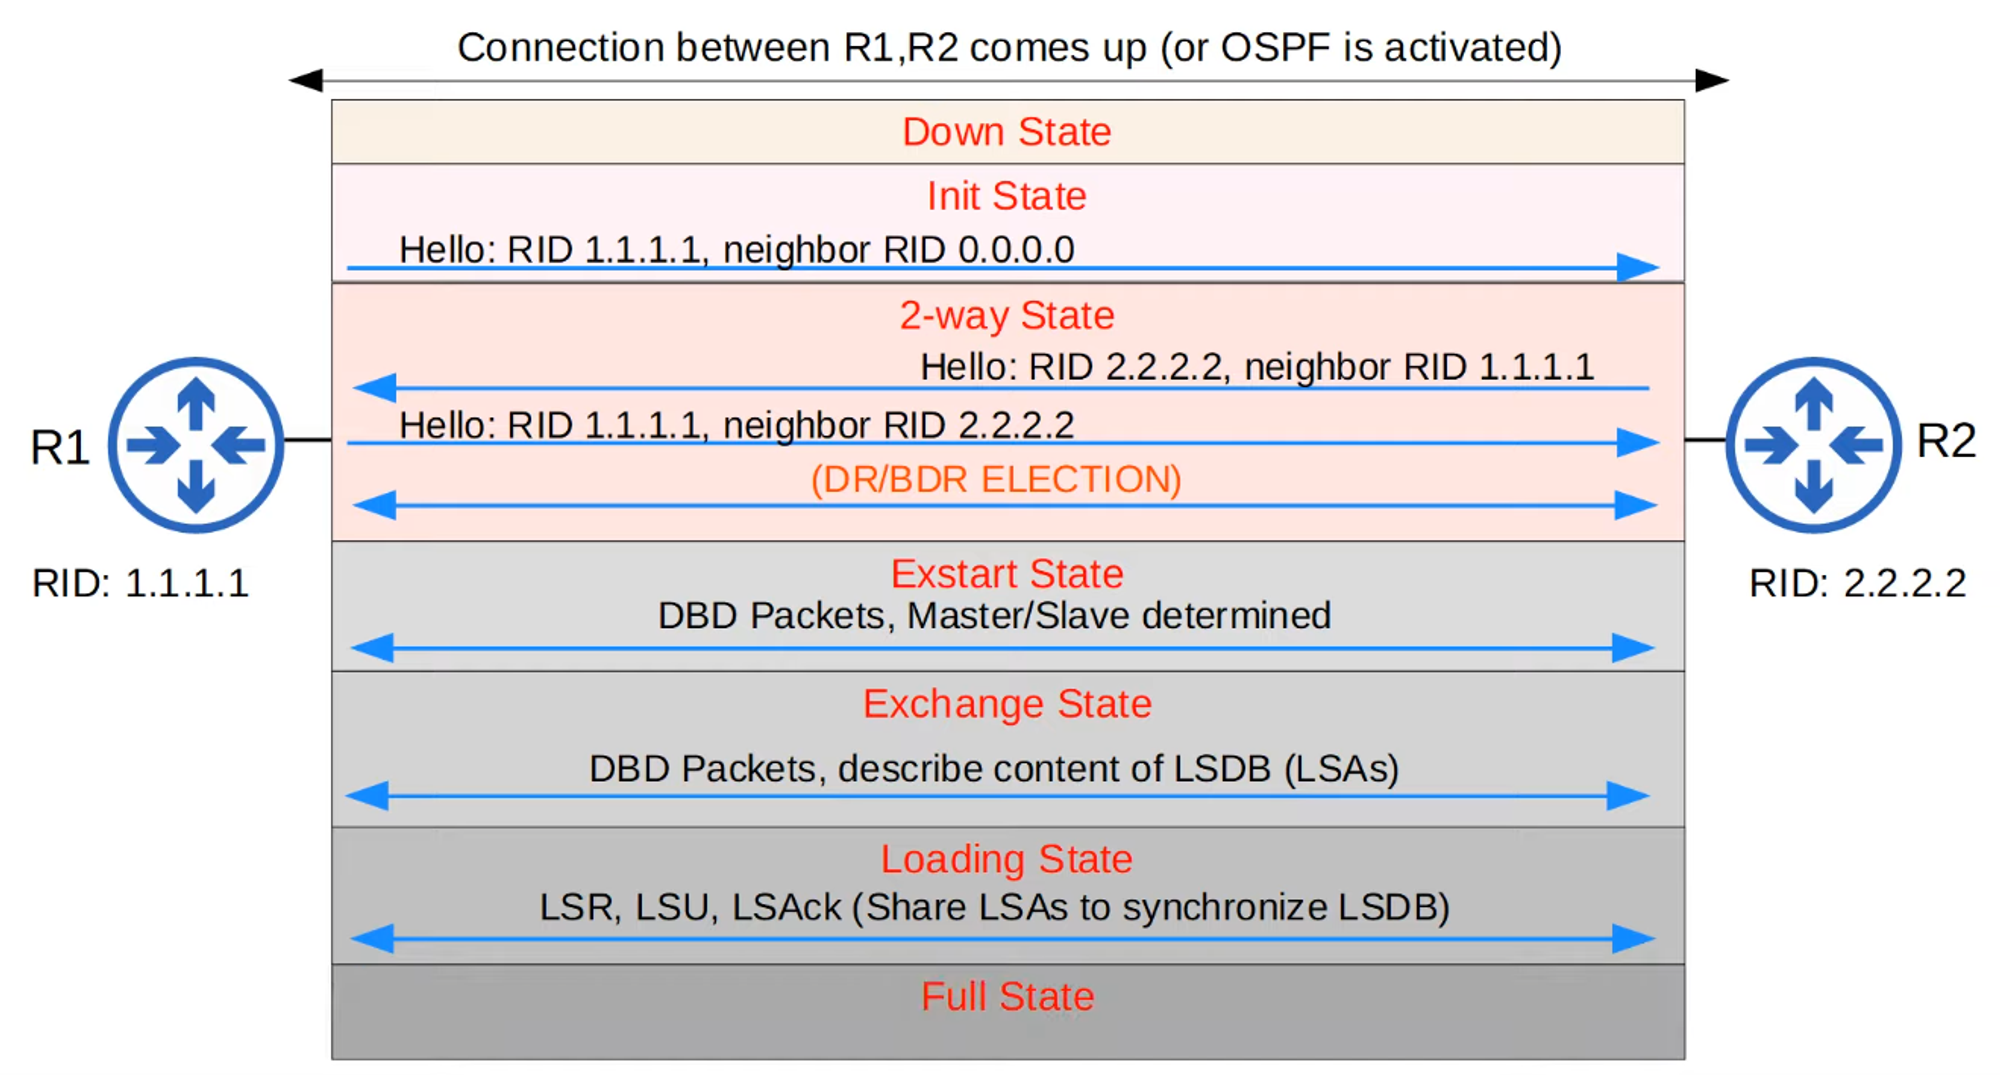
OSPF Neighbor States
-
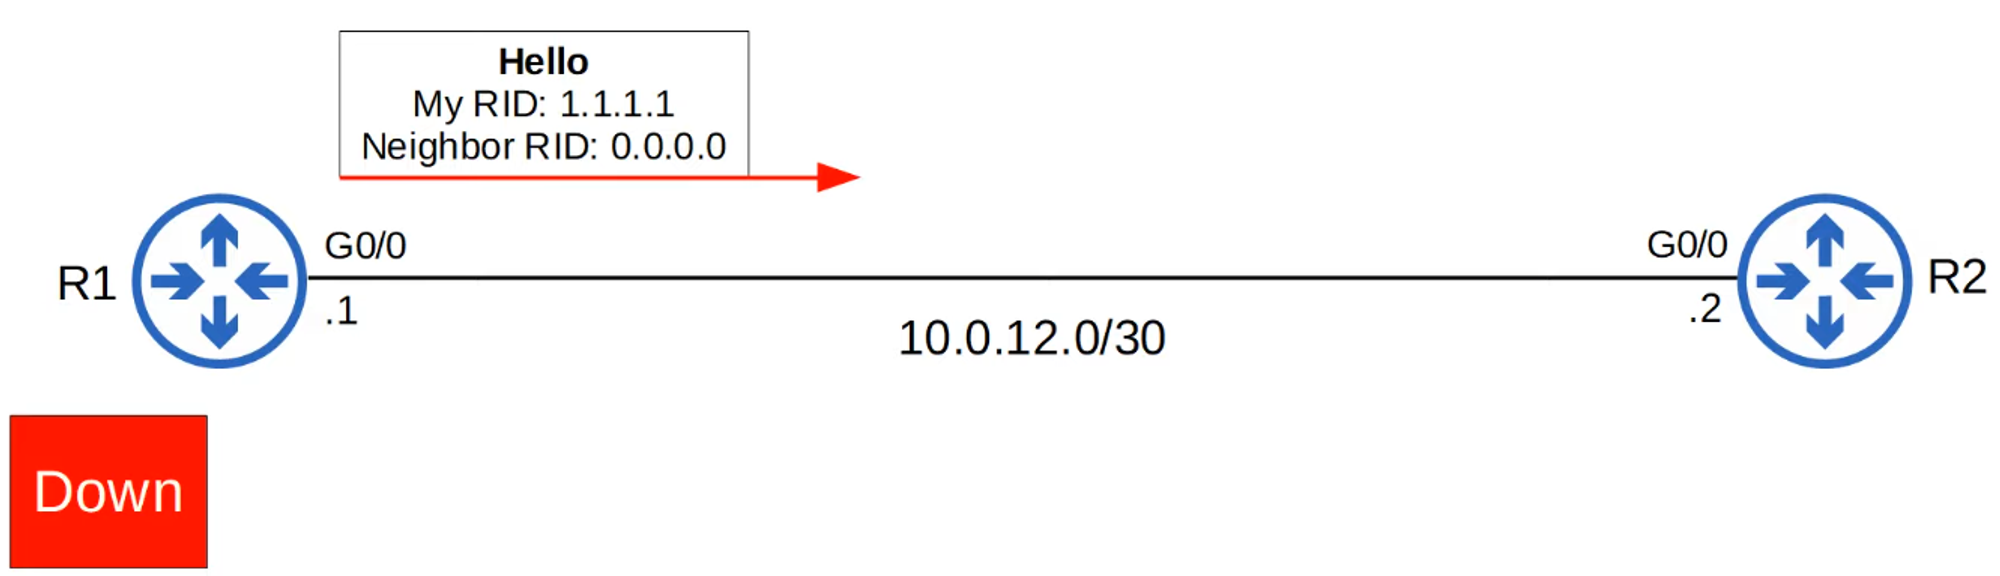
Down State:
- Initial state when OSPF is activated on an interface.
- Router sends Hello messages but doesn’t know about any neighbors yet.
-
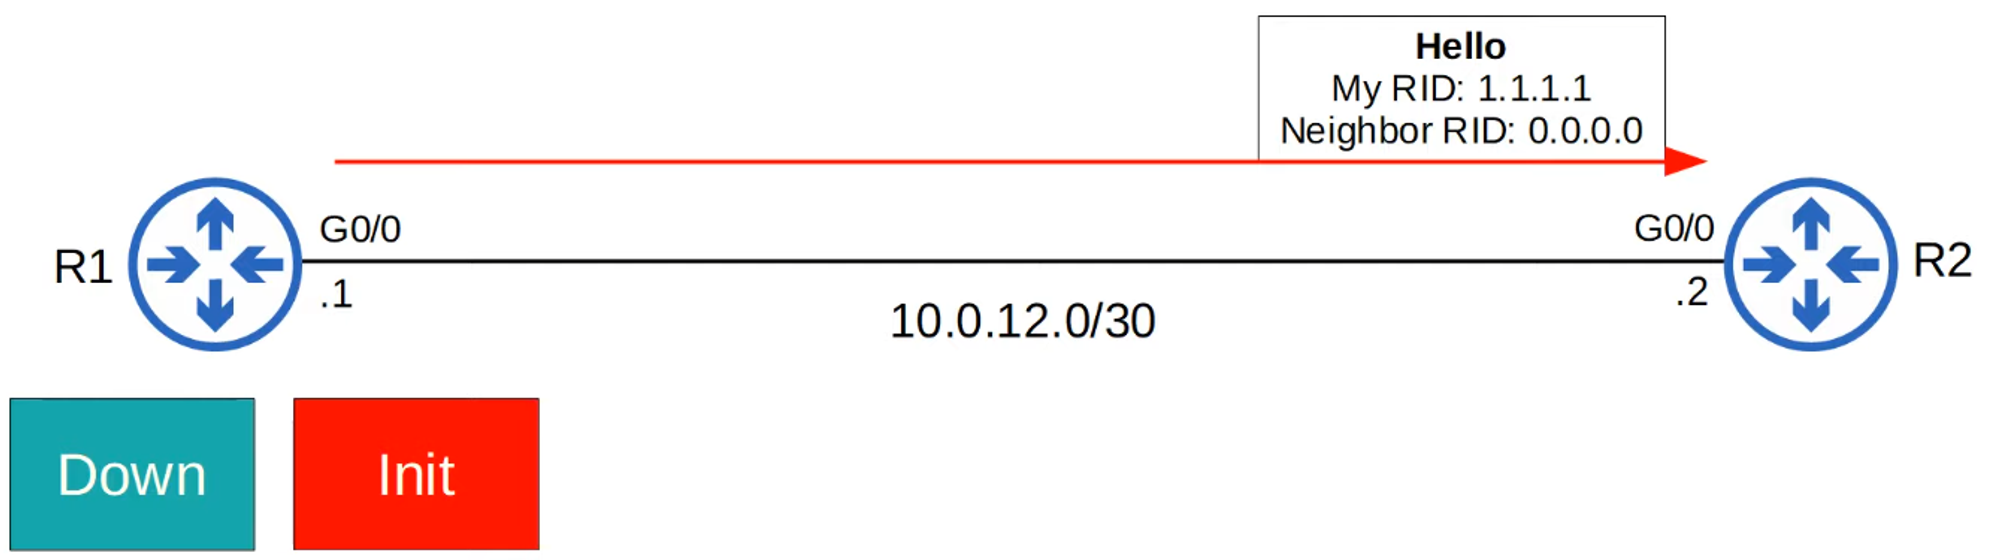
Init State:
- When a router receives a Hello packet, it adds the sender to its OSPF neighbor table.
- The neighbor state is Init until the router sees its own Router ID (RID) in a Hello packet from the neighbor.
-
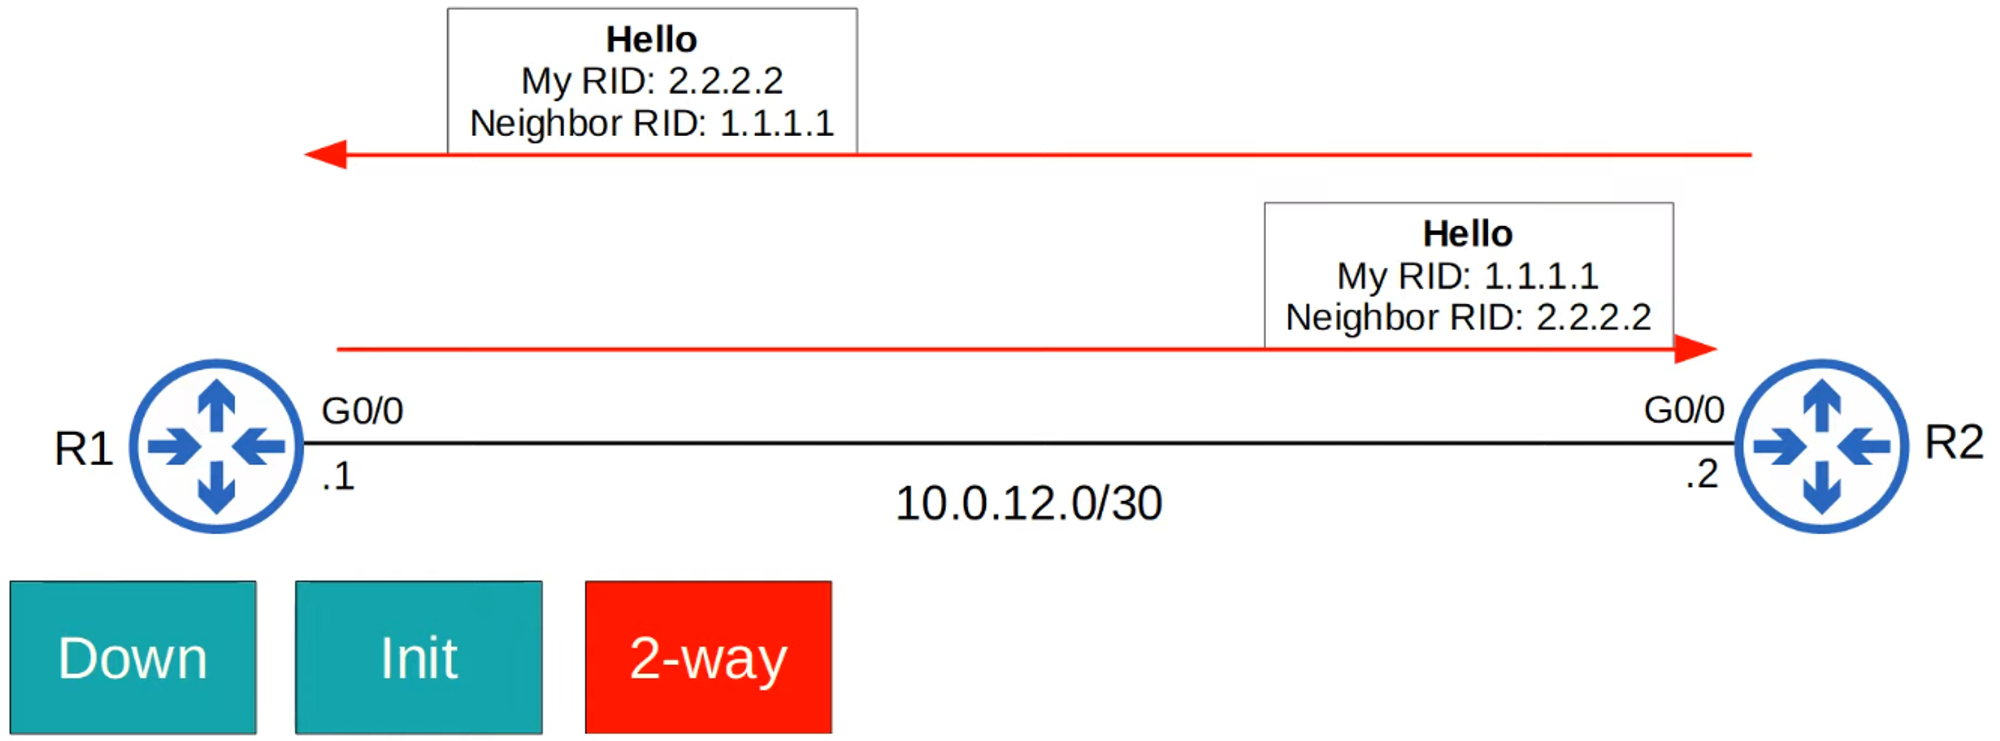
2-Way State:
- Achieved when a router sees its own RID in the Hello packet from the neighbor.
- At this point, the routers are ready to share LSAs and build a common LSDB.
- In some networks, this is where DR (Designated Router) and BDR (Backup Designated Router) elections occur.
-
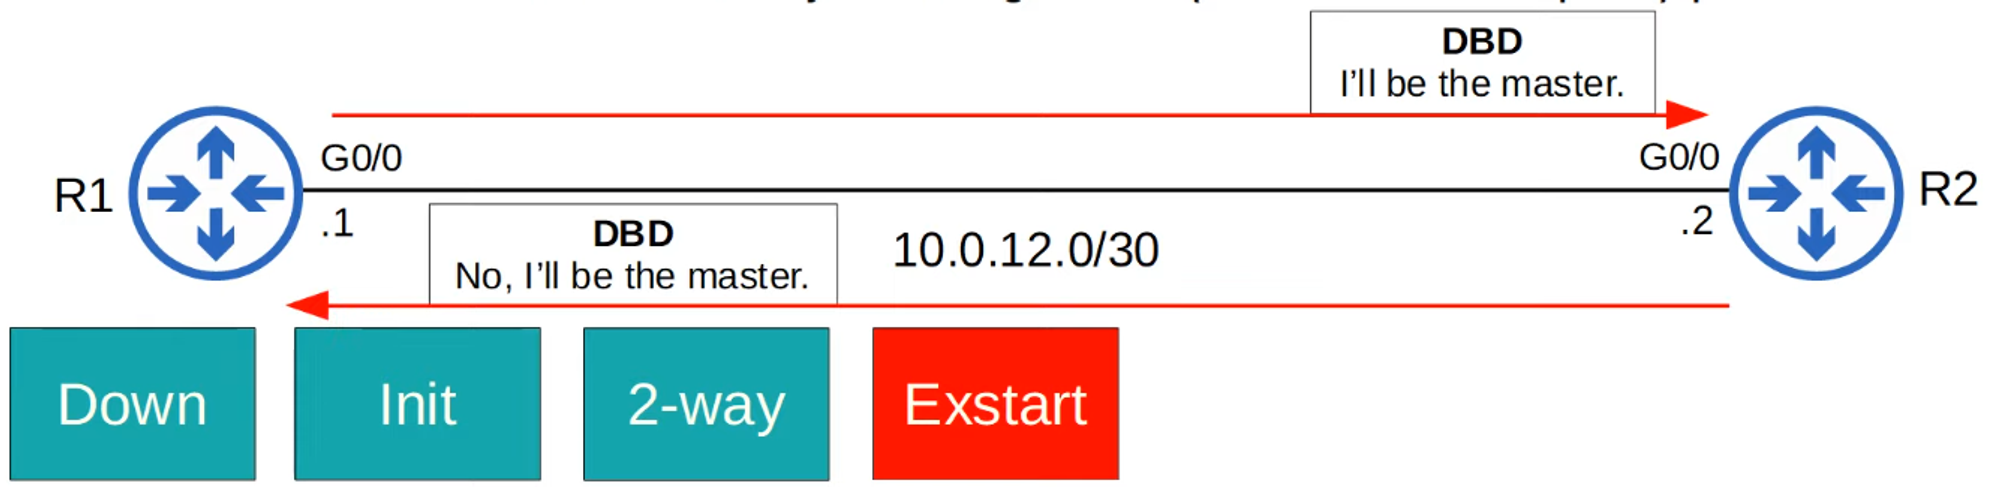
ExStart State:
- Routers prepare to exchange information about their LSDB.
- They must first decide which router will start the exchange (Master/Slave role).
- The router with the higher RID becomes the Master.
-
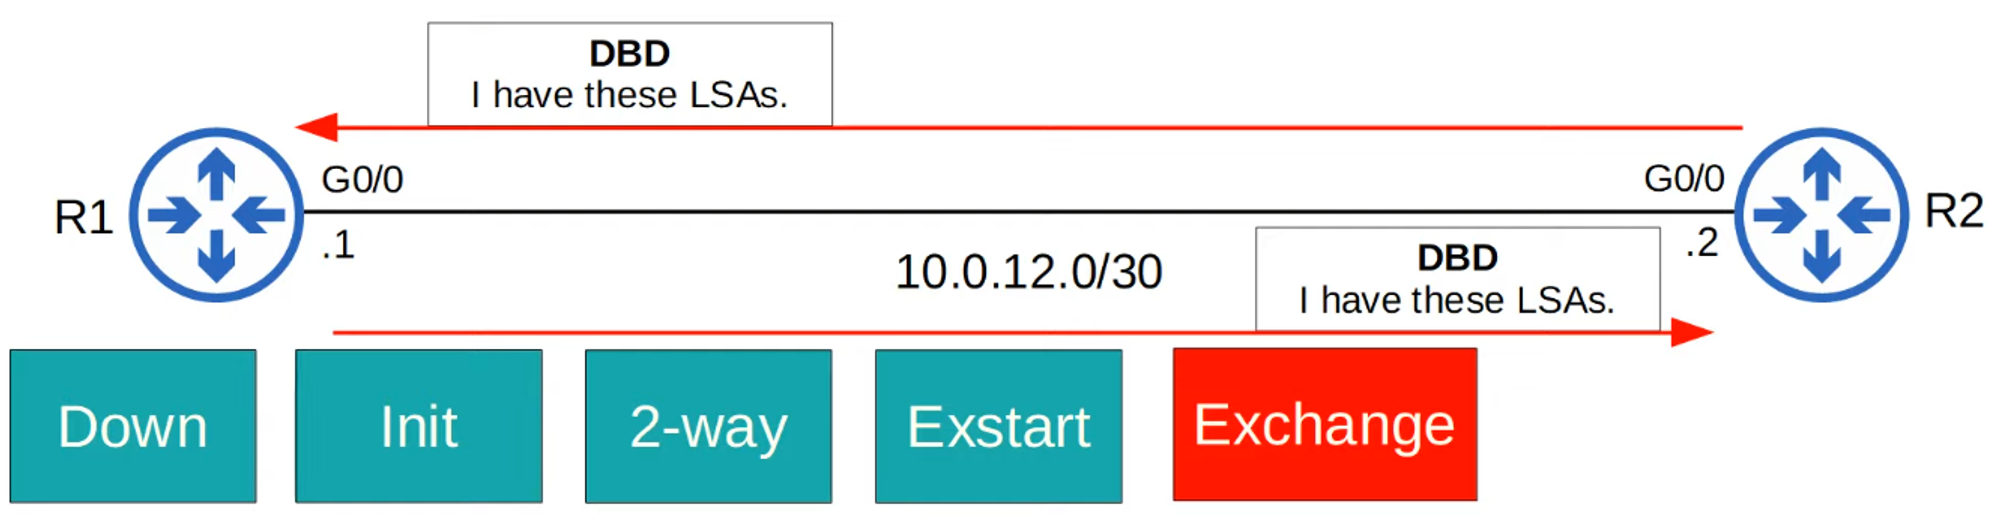
Exchange State:
- Routers exchange DBD (Database Description) packets, which contain a list of the LSAs in their LSDBs.
- Only basic information about the LSAs is included.
-
Loading State:
- Routers send Link State Requests (LSR) to request missing LSAs.
- LSAs are sent in Link State Update (LSU) messages.
- Routers acknowledge receipt of LSAs with LSAck messages.

-
Full State:
- The routers have a full OSPF adjacency and identical LSDBs.
- They continue to send and listen for Hello packets (every 10 seconds by default) to maintain the neighbor adjacency.
- If the Dead timer (40 seconds by default) reaches zero without receiving a Hello message, the neighbor is removed.
- Routers will continue to share LSAs as the network changes.

OSPF Neighbors Summary
-
Become Neighbors:
- Down State
- Init State
- 2-Way State
- (DR/BDR Election)
-
Exchange LSAs:
- ExStart State
- Exchange State
- Loading State
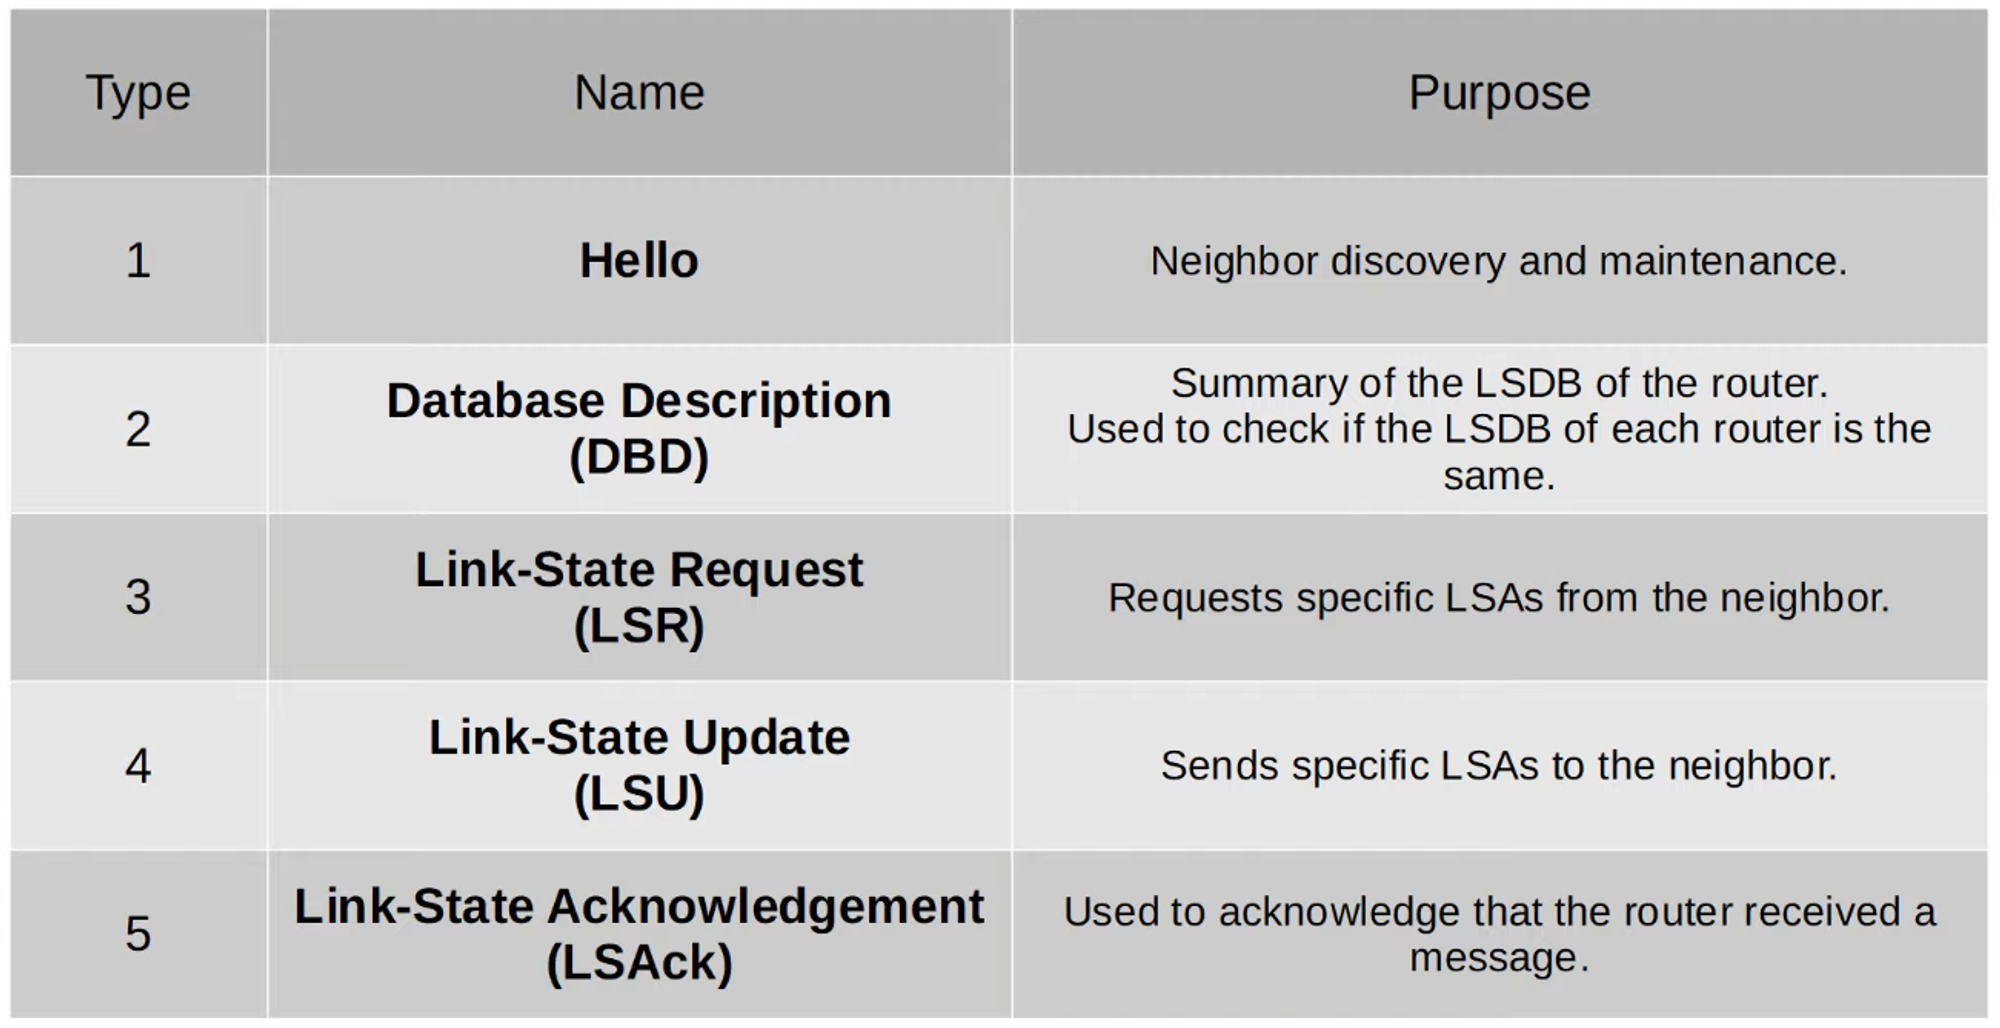
Summary of OSPF Message Types
Additional OSPF Configurations
Activate OSPF on an Interface
You can activate OSPF directly on an interface with:
R1(config-if)# ip ospf <process-id> area <area>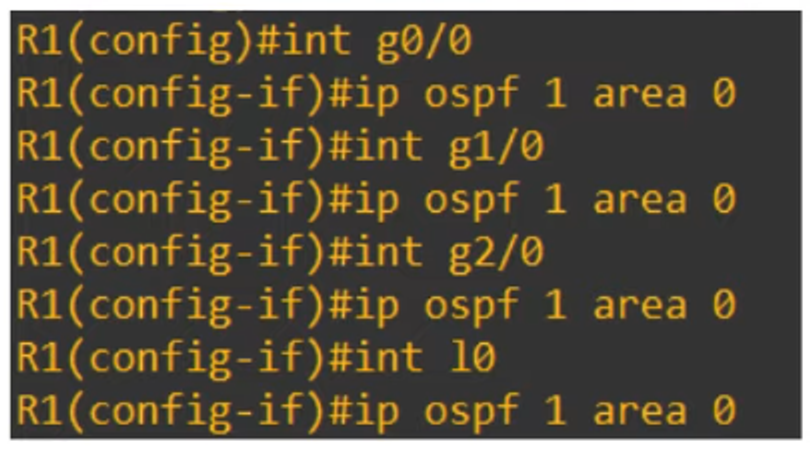
Configure All Interfaces as Passive
To make all interfaces passive by default:
R1(config-router)# passive-interface default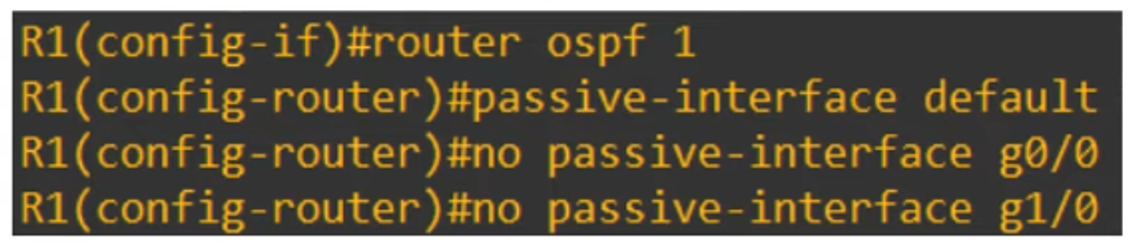
Exclude Specific Interfaces:
R1(config-router)# no passive-interface <interface-id>Different Output in show ip protocols
Activating OSPF directly on interfaces will display a different output in show ip protocols:
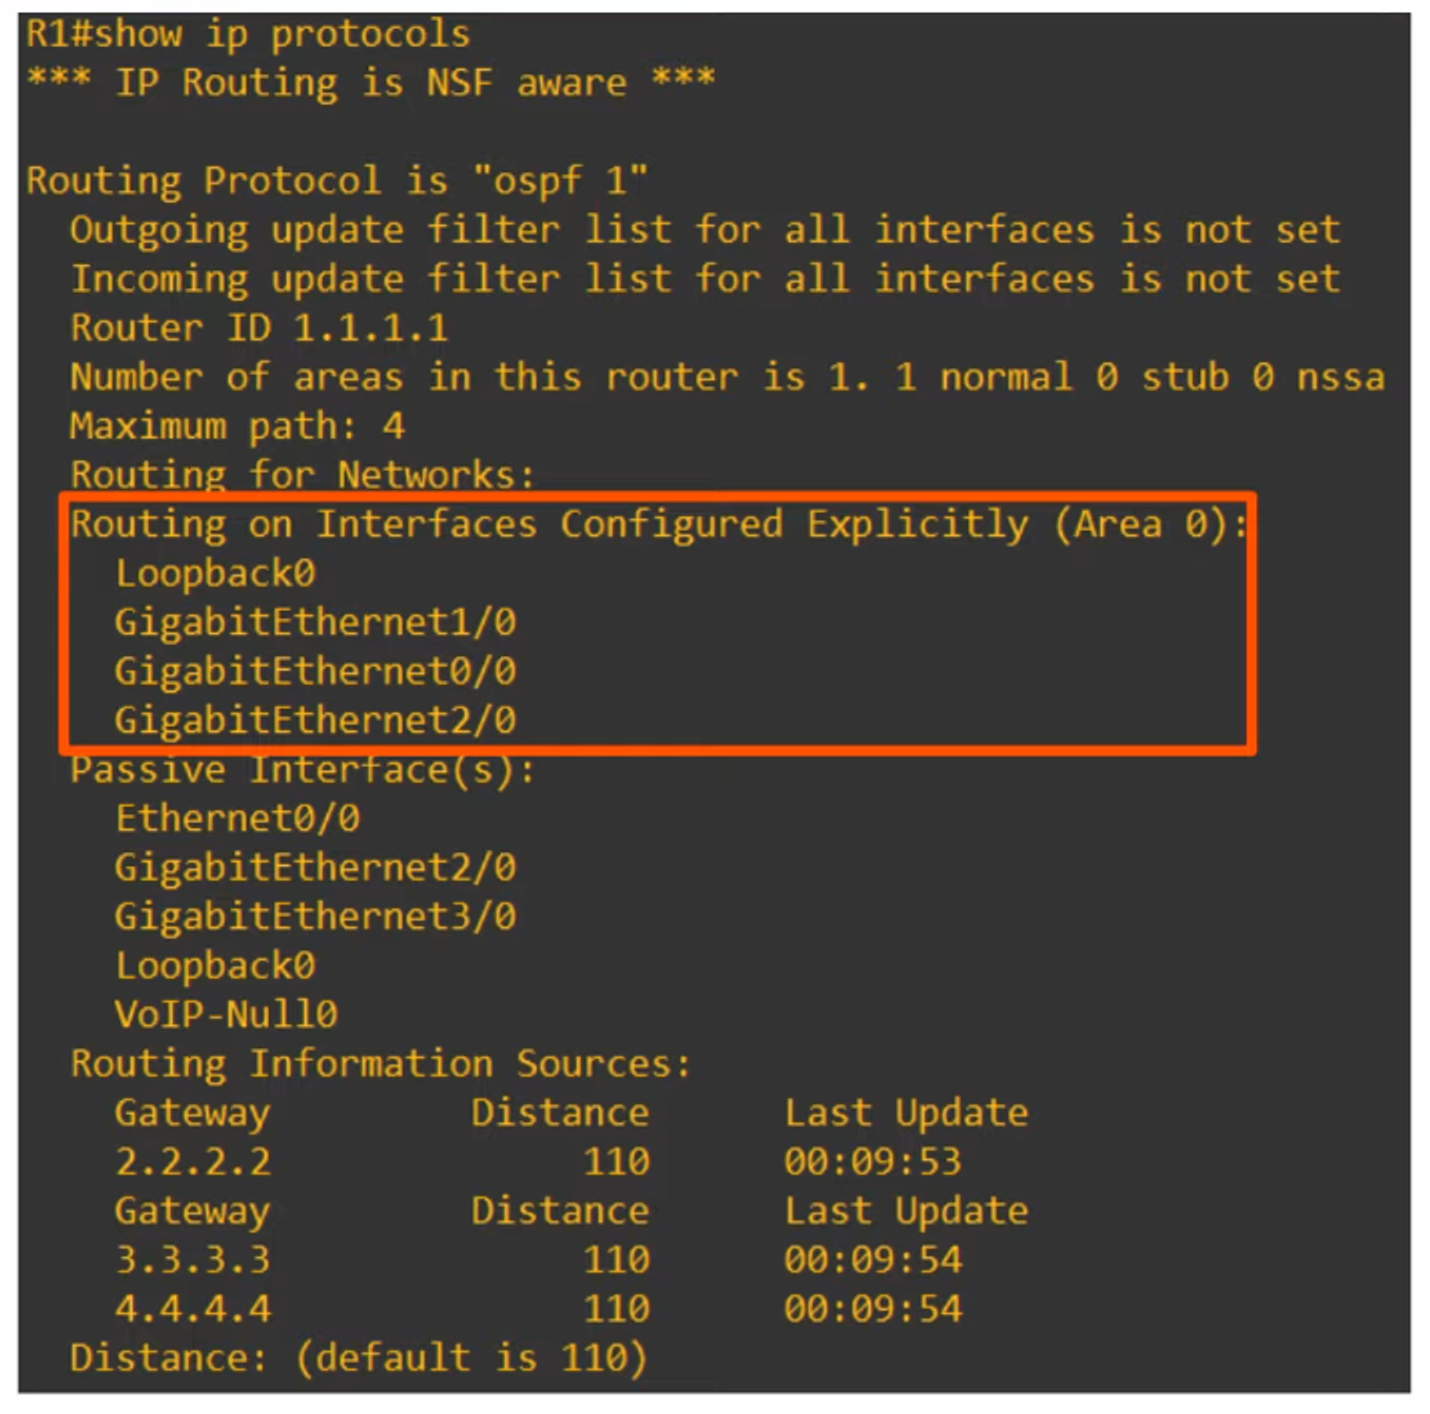
Routing on Interfaces Configured Explicitly (Area #): Displays the specific interfaces where OSPF is activated.
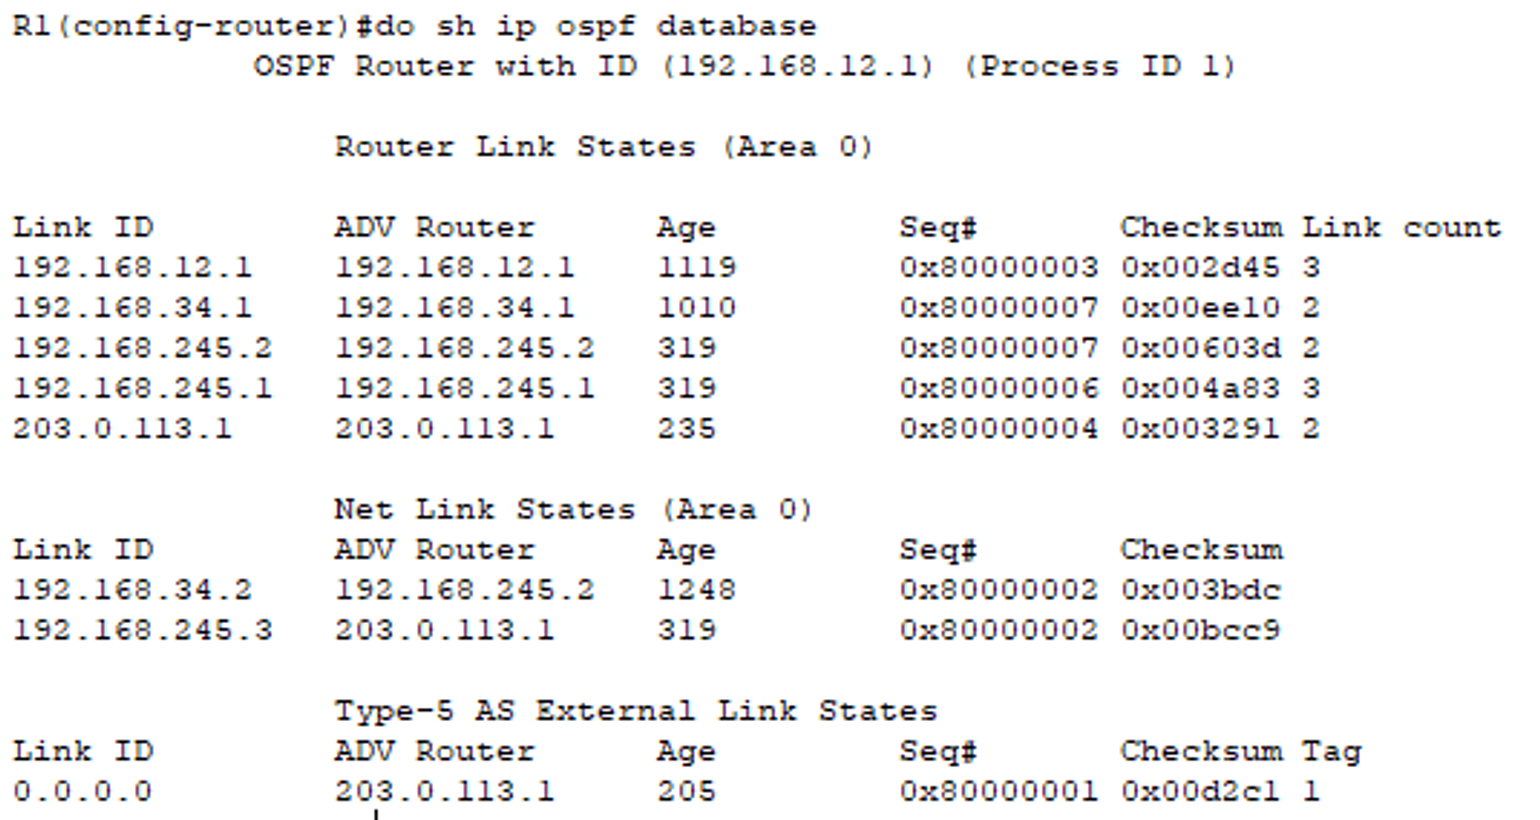
Viewing the OSPF LSDB
To view the LSDB of a device: